Connecting to a SQL Server Database
👤 This documentation is intended for Site Administrators and/or Database Administrators.
Prior to connecting the SQL Server Database, follow the platform specific instructions on whitelisting Sisense's IPs.
To connect to a SQL Server database, please ensure that Sisense can talk to the database over TCP. Sisense will check that the port is accessible through the firewall, that it responds to TCP, that Sisense can login, and that the server is accessible from Sisense.
These steps are modeled after Microsoft Azure's SQL Server guide, which offers even more information about securely connecting to a SQL Server database.
Open TCP ports in the Windows firewall
- Open Windows firewall from the start menu
- In the Windows Firewall with Advanced Security, in the left pane, right-click Inbound Rules, and then click New Rule in the action pane.
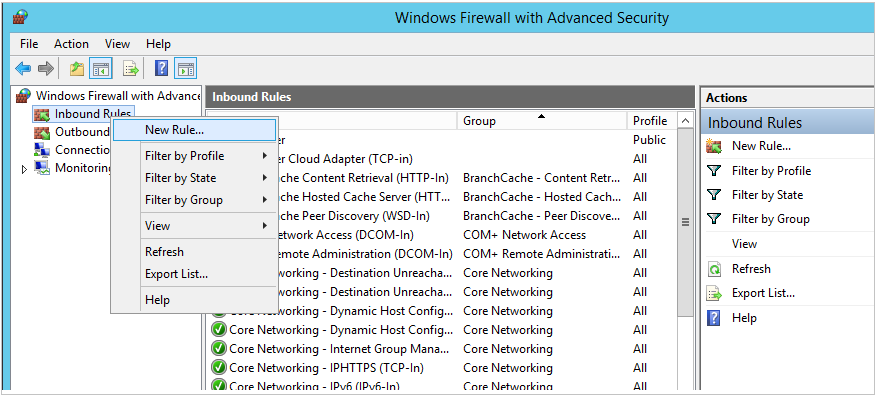
- In the New Inbound Rule Wizard dialog box, under Rule Type, select Port, and then click Next.
- In the Protocol and Ports dialog, use the default TCP. In the Specific local ports box, type the port number of the Database Engine (1433 for the default).
- Click Next.
- In the Action dialog box, select Allow the connection, and then click Next.
- In the Profile dialog box, select Public, Private, and Domain. Then click Next.
- In the Name dialog box, type a name and description for this rule, and then click Finish.
Configure SQL Server to listen on the TCP protocol
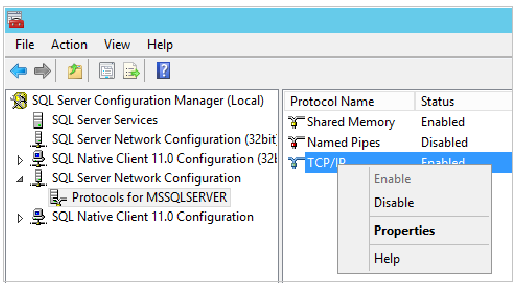
- While connected to the virtual machine, on the Start page, type SQL Server Configuration Manager and hit ENTER.
- In SQL Server Configuration Manager, in the console pane, expand SQL Server Network Configuration.
- In the console pane, click Protocols for MSSQLSERVER (the default instance name.) In the details pane, right-click TCP, it should be Enabled for the gallery images by default. For custom images, click Enable (if its status is Disabled.)
- In the console pane, click SQL Server Services. In the details pane, right-click SQL Server (instance name) (the default instance is SQL Server (MSSQLSERVER)), and then click Restart, to stop and restart the instance of SQL Server.
Create SQL Server authentication logins
To connect to the Database Engine from another computer, create at least one SQL Server authentication login.
- In SQL Server Management Studio Object Explorer, expand the folder of the server instance where the new login will be created.
- Right-click the Security folder, point to New, and select Login....
- In the Login - New dialog box, on the General page, enter the name of the new user in the Login name box.
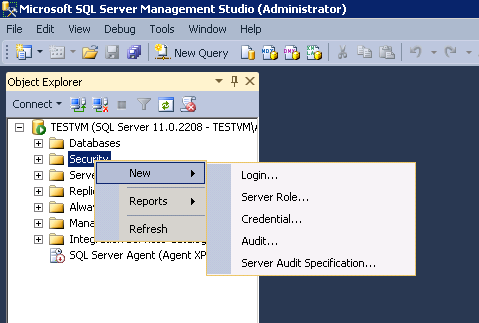
- Select SQL Server authentication.
- In the Password box, enter a password for the new user. Enter that password again into the Confirm Password box.
- To enforce password policy options for complexity and enforcement, select Enforce password policy (recommended). This is a default option when SQL Server authentication is selected.
- From the Default database list, select a default database for the login. master is the default for this option. If a user database has not yet been created, leave this set to master.
- Click OK.
Configure SQL Server for mixed mode authentication
The SQL Server Database Engine cannot use Windows Authentication without domain environment. To connect to the Database Engine from Sisense, configure SQL Server for mixed mode authentication. Mixed mode authentication allows both SQL Server Authentication and Windows Authentication.
- In SQL Server Management Studio Object Explorer, right-click the name of the instance of SQL Server (the virtual machine name), and then click Properties.
- On the Security page, under Server authentication, select SQL Server and Windows Authentication mode, and then click OK.
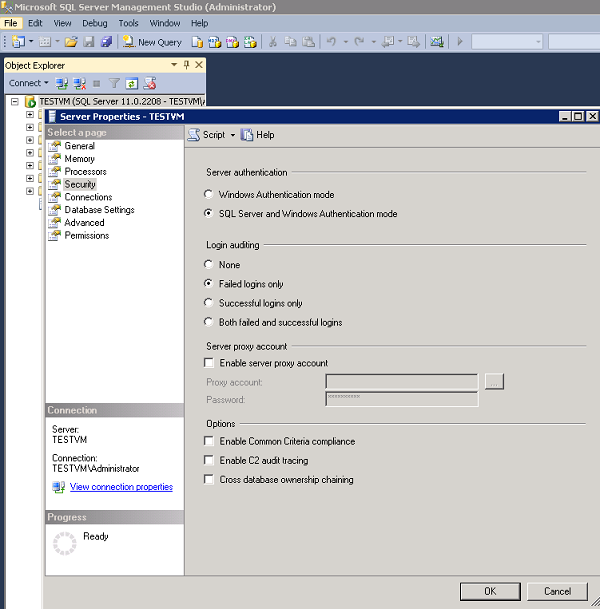
- In Object Explorer, right-click the server, and then click Restart. (If SQL Server Agent is running, it must also be restarted.)
- Finally, follow the instructions on granting table permissions so that Sisense can query the tables.